Have you ever tried to interact with the web using apps like cURL or some programming language with its HTTP Client Library? If so, you have undoubtedly run into struggles with HTTP headers, authentication, cookies, specific application layer requirements, or a seemingly simple task like taking a screenshot.
Puppeteer screenshot is one of the tools that Puppeteer offers to take and save screenshots of a page. And in this post, I will explain what Puppeteer screenshot is and what it is composed of. Second, I’ll show you how to use it, why it is used, and, finally, where it is used.
What is Puppeteer Screenshot?
Puppeteer’s screenshot method is used to automate and save screenshots. Taking a screenshot without Puppeteer always came with a steep learning curve.
It has multiple options/parameters for use, such as the ability to enable full-page screenshot and to set saving directory, picture encoding, screenshot type, and more. For example, Puppeteer sets the initial page size to 800×600 pixels, but you can change it with page.setViewport.
What is Puppeteer?
According to Puppeteer’s documentation on GitHub, “Puppeteer is a Node library that provides a high-level API to control Chrome or Chromium over the DevTools Protocol. Puppeteer runs headless by default but can be configured to run full (non-headless) Chrome or Chromium.” You can forget about manually adding HTTP headers and dealing with the complicated libraries that steepen your learning curve.
Puppeteer has many methods that are simple and flexible, like waitForSelector, which ensures the needed content is loaded. That way you don’t have to wait for the whole page to load and you can take faster screenshots. Put simply, Puppeteer provides ways to automate interaction with the browser, thus changing the way bots work.
How to Install Puppeteer
Installation takes only two steps.
1. Install Node.js
Download Node.js here and follow the installation steps.
Make sure that node binary is in your environmental variables or PATH by typing node -v in the command line.
Note: Be sure to install the newest version of Node.js. The minimal requirement for Puppeteer is Node.js v6.40, but the versions are interdependent.
2. Install Puppeteer
To install Puppeteer, open your command line and type the following code:
npm i puppeteer
# or "yarn add puppeteer"
This command will install puppeteer, and download and install the newest compatible version of Chromium. You can also use Node.js’s environmental variables to install a specific Chrome/Chromium version.
How to Take a Screenshot Using Puppeteer
Below is a simple code that takes a screenshot for a given website:
const puppeteer = require('puppeteer');         // Require Puppeteer module

const url = "https://www.testim.io/";           // Set website you want to screenshot

const Screenshot = async () => {                // Define Screenshot function

   const browser = await puppeteer.launch();    // Launch a "browser"

   const page = await browser.newPage();        // Open a new page

   await page.goto(url);                        // Go to the website

   await page.screenshot({                      // Screenshot the website using defined options

    path: "./screenshot.png",                   // Save the screenshot in current directory

    fullPage: true                              // take a fullpage screenshot

  });

  await page.close();                           // Close the website

  await browser.close();                        // Close the browser

}

Screenshot();                                   // Call the Screenshot function
Copy and paste the code, save it as a code.js file, and run it in your CLI with the following command:
node code.js
You can also test the code in a browser. Simply paste the code here and watch the result.
This example was a simple way of taking a screenshot of the full page. You can also take a screenshot of the particular HTML element.
Puppeteer Screenshot to Take Screenshot of an Element
You only have to make some minor changes to the above code and refer to the element you want to take a screenshot of using its selector.
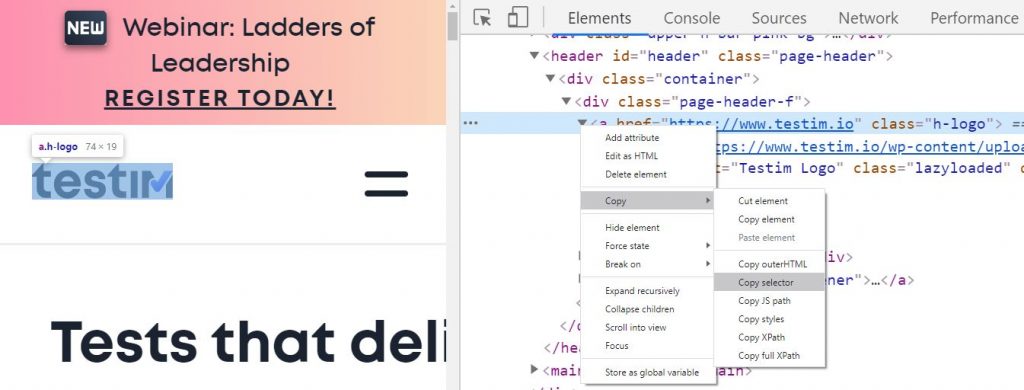
Simply copy the selector of an element by right-clicking on the element and selecting Inspect. Then, right-click the highlighted part and select Copy and Copy Selector.

The selector I’ve copied looks like this: #header > div > div > a.h-logo. I’ll paste it into the code below:
const puppeteer = require('puppeteer');      // Require Puppeteer module
const url = "https://www.testim.io/";        // Set website you want to screenshot
const Screenshot = async () => {             // Define Screenshot function
  const browser = await puppeteer.launch();  // Launch a "browser"
  const page = await browser.newPage();      // Open new page
  await page.goto(url);                      // Go website
  await page.waitForSelector('#header > div > div > a.h-logo');          // Method to ensure that the element is loaded
  const logo = await page.$('#header > div > div > a.h-logo');        // logo is the element you want to capture
  await logo.screenshot({
    path: 'testim.png'
    });
  await page.close();                        // Close the website
  await browser.close();                     // Close the browser
}
Screenshot();                                // Call Screenshot function
This is what you will get:

Why Use Puppeteer screenshot?
By now, I hope you understand the basics of taking a screenshot with Puppeteer. But how is Puppeteer different from other Node.js modules?
Conventional ways of interacting with the web apps require knowledge of JavaScript, HTML, CSS, the tools you are going to use, and much more. Node.js is cross-platform and is mainly used for front-end and back-end application servers. It has endless use cases such as:
- Webserver
- Proxy server
- Chat app
- API gateway
- Microservice architecture
- Server-side rendering, etc.
However, Puppeteer enables you to use Node.js as a client, putting yourself in the user-side viewpoint. Node.js becomes a bot that will open a web browser, go to a new tab, open the website, and do much more.
Where Is Puppeteer Screenshot Mostly Used?
Have you ever wondered where you could use a simple screenshot function?
Well, there are many ways. Here are the most significant use cases.
E2E testing
Puppeteer gives you a way to interact with the web. Being open-source and providing broad support for its use makes it more and more popular in end-to-end testing.
You can use Puppeteer screenshot to ensure your application looks as intended and present clients with expected visuals. Puppeteer’s screenshot merely provides a regression testing validation to your CI/CD testing pipeline where you test visual bugs or functionality.
Machine learning
Automated visual testing looks for a difference in visual rendering. Differences mainly occur due to the browser version, client machine hardware, and other factors. Checking visual rendering by hand would almost certainly miss low-level visual aspects, such as the absence of an image pixel from the original image.
And it’s also a lot of manual work. However, combining machine learning algorithms and generating test data with Puppeteer screenshot, you can effortlessly classify the anomalies collected by Puppeteer screenshot against expected image pixels, thus speeding up your testing.
Web scraping
Web scraping cannot be more comfortable. Just “take a picture” of the URL; nowadays, you can extract meaningful information from pictures. Screenshot a website’s area, element, or the whole page, and then save the screenshot.
By doing this, you can generate the data you can use to review the dynamicity of a website or visual evidence.
Archiving
Building websites with the content as a service model, the website appearance continually changes. Puppeteer screenshot can help you create a timeline of visual changes. Alternately, you can easily archive magazines, newspapers, or legal documents.
As you can see, all of the cases above correlate with the simple function as the screenshot. It’s mighty. There are countless use cases that the Puppeteer screenshot brings, you just need to find yours.
Summary
In this post, I discussed the what, why, and how of taking screenshots with Puppeteer.
Puppeteer screenshot is a must-have tool for testing web apps. It is a part of a Puppeteer that isn’t interacting with the web by mimicking the client; it is the client. Identifying and visualizing differences in the UI, comparing screenshots on multiple hardware or software platforms, and needing to provide constant appearance, is a painful process if not automated.
Luckily, Puppeteer gives a robust and straightforward foundation to do to it. Puppeteer screenshot enables you to see what clients see and generate the test data. It can help you screenshot the specific area of the website and capture only relevant data. If you are interested in E2E testing, check out Testim’s new feature, Screenplay.
Building stable apps is more important than ever. Testing the network issues, client-side rendering, performance, and many more aspects of using automation are being implemented frequently.
Testim provides you with stable testing solutions that you can use to help automate visual regression as well as reduce maintenance of, simplify, and automate QA needs. Sign in here for more or schedule a demonstration.


